
Tudor Board Repair becomes urgent the moment you spot hairline cracks, flaking paint, or trim lifting from the stucco. Moisture moves fast through those openings, turning a simple touch-up into a bigger, pricier fix.
Tudor Board Repair
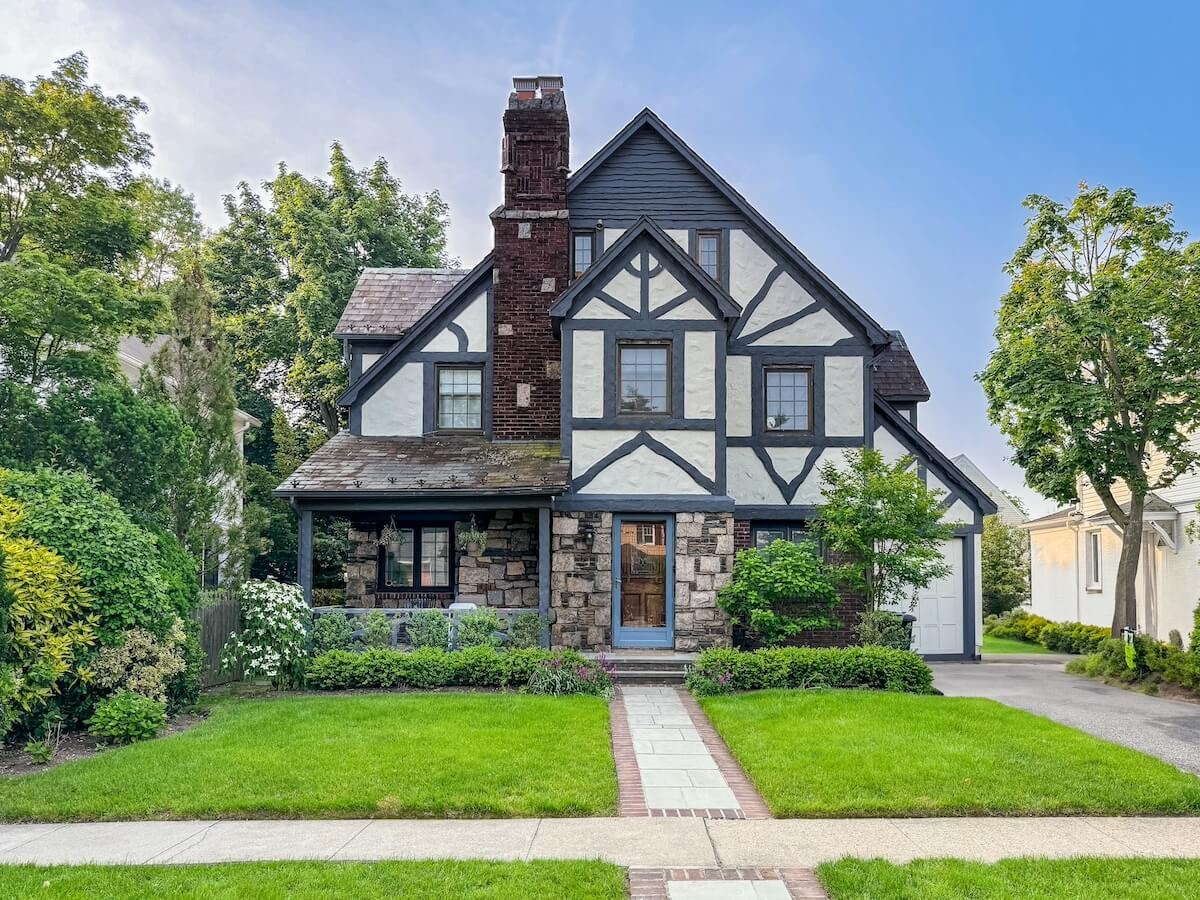
Tudor boards are the decorative wooden exterior battens and gable trims that create the classic half-timber look. They’re usually wood (cedar, pine, or fir), engineered wood, or a wood-look PVC/composite. When water finds the end grain, joints, or nail holes, you get rot, gaps, and flaking paint. Catching problems early keeps costs and headaches low.
What Are “Tudor Boards,” Exactly?
Think of the vertical and diagonal strips you see on Tudor-style homes. Those strips:
- Cover expansion joints in stucco or panel siding.
- Frame gables, bays, and dormers as “bargeboards” or “gable trim”.
- Add shadow lines that define the architectural style.
Typical weak spots:
- Board ends where they meet soffits, windows, or the roofline.
- Butt joints in long runs.
- Nail heads that were never sealed.
- Bottom edges without drip caps or flashing.
Quick Self-Check: 60-Second Tudor Board Repair Inspection
Grab your phone and a pencil. Walk around your home and circle trouble spots:
- Peeling paint near board ends or fasteners.
- Hairline cracks where boards meet stucco.
- Soft or dark wood when pressed with a pencil tip.
- Gaps you can slide a card into at joints.
- Stains or streaks under gables after rain.
See these? Ask yourself: did last winter or a heat wave push moisture into those joints? If yes, plan a fix before the next season rolls in.
What Causes Damage (and How to Prevent It)
Water first, sun second
Moisture sneaks in through failed caulk, unsealed end grain, and open nail holes. UV breaks down paint and sealant after.
Prevention moves:
- Back-prime all sides (especially end grain) before installation.
- Use stainless or hot-dipped galvanized nails; set and seal every head.
- Install drip caps over horizontal trim and kick-out flashing where roofs meet walls.
- Keep ground clearance; boards shouldn’t wick splashback.
- Caulk with a high-quality, paintable elastomeric at stucco/trim joints.
- Repaint on a 5–7 year cycle, sooner on south/west exposures.
DIY Fixes You Can Do Safely
If your ladder skills are solid and the area is within one story, you can tackle small repairs. Stay off steep roofs and skip anything near power lines.
Small cracks and gaps
- Clean with a brush. Remove loose paint and dust.
- Open the crack slightly with a utility knife for better adhesion.
- Fill with a flexible, paintable sealant. Tool it smooth.
- Prime the repair with a bonding or alkyd primer.
- Paint two coats, extending onto surrounding boards.
Minor rot (quarter-size or less)
- Remove soft wood with a chisel.
- Treat the cavity with a borate wood preservative.
- Fill with a two-part epoxy wood repair system. Shape while green.
- Sand, prime, paint as above.
Loose boards
- Pre-drill and re-fasten with corrosion-resistant screws.
- Counter-sink, fill, prime, paint.
- Seal edges where trim meets stucco.
Skip DIY if: the board spans a gable peak, rot reaches the sheathing, or you see mold behind the trim. That’s pro territory.
Pro-Level Repairs and Smart Upgrades
When boards are badly decayed or the house is tall, a contractor brings staging, safety gear, and speed.
What a pro might do:
- Remove and replace full board runs using scarf joints (not butt joints).
- Install flashing at horizontal breaks and window heads.
- Back-prime replacements and seal end grain before they go up.
- Use factory-finished composite or PVC in splash zones to cut future rot.
- Apply a buildable primer on weathered areas, then two topcoats for uniform color.
Working with someone who handles both carpentry and painting keeps the job moving. If you’re in the GTA and comparing tudor board repair near you, you can check out Home Painters Toronto for examples of tall-access trim work and coordinated repair-plus-paint projects.
Material choices that last
- Cedar: Naturally rot-resistant. Great with careful priming and paint.
- Engineered wood: Stable and affordable; needs top-tier sealing at cuts.
- PVC/composite: Won’t rot; paint sticks well with the right primer; ideal near grade or in heavy splash zones.
Paint system that holds up
- Spot prime bare wood with alkyd or bonding primer.
- Full prime if the surface is chalky or patchy.
- Topcoat with a high-quality exterior acrylic in a satin or low-sheen finish.
- Mind your dry times and temperature windows printed on the can.
Cost Drivers You Can Control
You want a straight answer on price, but every house is different. Focus on the levers you can pull:
- Access: The higher the gable, the more staging or lift time.
- Scope: Spot repairs vs. full runs.
- Material: Wood vs. PVC/composite.
- Prep level: More prep now means longer paint life later.
Want to lower the bill? Group trim fixes with your next exterior repaint so set-up and clean-up are shared.
A Simple Maintenance Plan That Works
Keep the look without constant touch-ups:
- Spring: Rinse facades with a garden hose. Check caulk at joints.
- Summer: Touch up paint on the sunniest side.
- Fall: Clear gutters. Watch for stains under roof edges.
- Every 2–3 years: Walk the perimeter with a tube of caulk and a quart of matching paint. Ten minutes here saves hours later.
Set calendar reminders. Snap photos of trouble spots so you can compare year to year. See a change? Act fast.
Why Staying Ahead on Tudor Board Repair Saves You Stress
Staying on top of Tudor board repair isn’t just about keeping your home beautiful, it’s about protecting it from long-term damage. Cracks, peeling paint, or boards pulling from stucco may look small, but they open the door to water intrusion and costly repairs later. A little routine care, combined with timely fixes, goes a long way toward preserving that classic half-timber look. Whether you handle minor touch-ups yourself or bring in a pro for bigger jobs, the key is not to wait. Spot problems early, act quickly, and your Tudor home will keep its charm for years to come.


Comments are closed